
If you want to create a perfect website with WordPress for your business, blog, or portfolio, but don’t know where to start? Don’t worry! With just a few simple steps, you can build your dream WordPress website up and running in no time. You can create anything from a simple blog to a complex eCommerce website with WordPress. WordPress is an efficient and powerful platform for creating websites, allowing users to build beautiful and functional websites without extensive web development knowledge. WordPress users can build websites that reflect their personal style. It’s an open-source platform that helps developers design and maintains websites with ease.
WordPress is a very popular CMS across the internet. It’s used by 56% of CMS user that’s means 39.5% of all use WordPress. A bunch of WordPress free plugins and themes that can enhance your website’s functionality and design.
This article will guide you through the process of how to build your dream WordPress website quickly and efficiently.
Step 1: Choose a Host
First, you will need to choose a web hosting provider and sign up for an account. With the rise of digital content and websites, having a reliable hosting service for your WordPress website is essential. Hosting is an integral part of your website. It provides the platform on which your content is served and accessed by users. When it comes to selecting a host for your WordPress website, there are many options out there. It’s important to make sure you’re selecting a reliable hosting provider that can deliver on performance, features, and cost-effectiveness. You should several factors to consider. From cost to the reliability, understanding what you need in a hosting provider can help ensure that your website runs smoothly and meets your expectations.
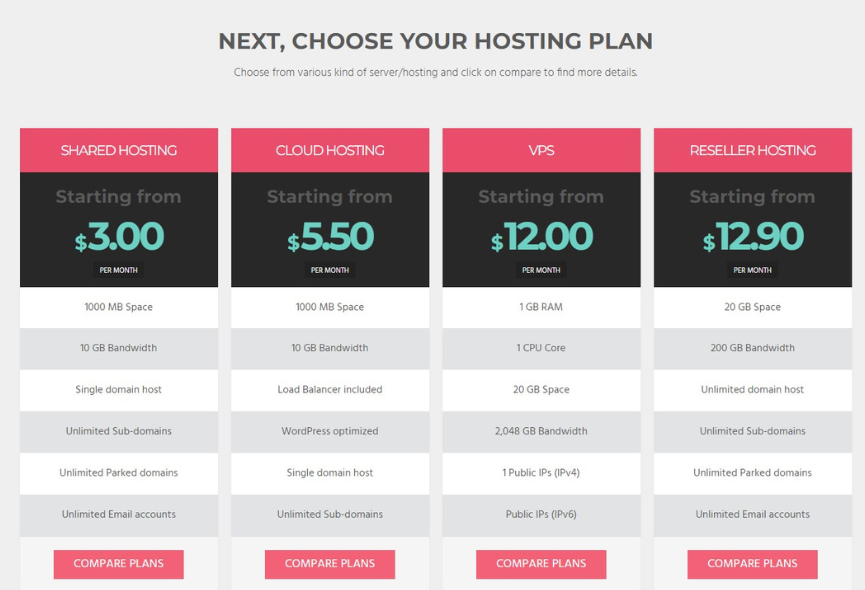
Type of Hosting:
(i) Traditional Hosting:
Traditional hosting is a web hosting service that allows customers to store and access their website information on physical servers. It is the original form of web hosting and is still one of the most popular options today. Traditional hosting involves renting space on a server owned by a web host. Which then provides the customer with internet connectivity so they can manage their website or application.
With traditional hosting, customers have full control over their websites and applications as well as complete access to all system resources. This includes an operating system, database storage capacity, memory allocation, and more. Additionally, traditional hosting services offer additional features such as automated software updates, daily backups of data, and 24/7 technical support in case of any issues or emergencies. These features make traditional hosting great for businesses looking for reliable performance at an affordable price point.
(ii) Shared Hosting:
Shared hosting is a type of web hosting service that allows multiple websites to be hosted on the same server. It is one of the most popular and economical options for website owners. As it allows them to have their own space on the internet without having to pay for an entire server. Shared hosting works by dividing a single physical server into multiple virtual servers, each with its resources and virtual environment. This makes it possible for each user to store data and run applications without interfering with other users’ sites or resources.
With shared hosting, customers benefit from access to all the features offered by web hosting providers such as email accounts, databases, FTP access, and more. Additionally, they can choose from numerous plans depending on their budget and requirements. For example, some plans may offer unlimited disk space while others may provide extra features such as automatic backups or security scanning services.
(iii) Dedicated Servers:
It is a physical web server. Typically located in a secure data center, that is used to host a single website or application. Dedicated servers offer greater levels of control, security, and flexibility than shared hosting environments.
When compared to shared hosting plans, dedicated servers are more expensive because they require the purchase and maintenance of specialized hardware. However, the increased cost can be justified by providing superior performance and reliability for mission-critical websites or applications with high traffic volumes. Additionally, most dedicated server solutions allow customers to customize their environment to their exact needs regarding storage space and access permissions.
Dedicated servers provide an ideal solution for businesses requiring reliable performance from their online applications or websites as well as companies needing greater customization options than what is available on shared hosting plans.
(iv) Virtual private servers (VPS):
Virtual Private Server (VPS) functions similarly to a physical server. It hosts websites on its virtual operating system, providing an isolated environment for improved security and performance. It also provides users with resources such as RAM, CPU power, and storage space allocated exclusively for their website or application without sharing those resources with other sites or applications hosted on the same server. This allows websites hosted on VPS servers to run more efficiently while remaining affordable compared to dedicated servers.
(v) Cloud Hosting:
Cloud hosting is a technology that allows businesses and individuals to host their websites on the internet without having to manage their physical servers. The primary benefit of cloud hosting is its scalability – resources such as data storage, bandwidth, and processing power can be quickly increased or decreased depending on the user’s needs at any given time. This makes cloud hosting ideal for businesses with unpredictable traffic or those expecting rapid growth in the near future as it offers flexibility when it comes to handling large volumes of data and traffic.
Best WordPress Web Hosting Providers: Arwebhosting, SiteGround, Bluehost, DreamHost, Hostinger, HostGator.
Step 2: Install WordPress
First, choose the hosting platform that best fits your needs. Most hosting companies offer installation packages for WordPress so make sure to select one of these when registering with the host. Once this is complete, log into the hosting account control panel and find the “Install Now” button for WordPress. Click this button and follow the on-screen instructions given by the installation software. This will guide you through setting up your database details and installing all of the files necessary to run a WordPress site.
- Download WordPress. Download the WordPress package to your local computer from https://wordpress.org/download/. …
- Upload WordPress to hosting account. …
- Create MySQL database and user. …
- Configure wp-config. …
- Run the installation. …
- Complete the installation.
Step 3: Select Theme and Plugins
Themes are an essential part of any WordPress website. Selecting the perfect theme and plugins can help make your website stand out from the rest. As it affects how your site looks, feels, and interacts with users. When selecting a theme, consider its design, features, and customizability. Choose a clean look that will represent your business or organization in the best light possible, while still being easy to navigate. There are plenty of free themes available that provide great functionality and customization options. You can easily choose your best theme from wordpress.org
Plugins can extend the functionality of WordPress beyond what is included in a theme. Plugins can help you add extra features like contact forms or photo galleries to name just two examples; there are thousands available from both free and paid sources. Click here to add the best Theme and Plugins.
Step 4: Customize with Widgets
Using widgets, you can add features such as social media feeds, contact forms, photo galleries, and more. Not only do these widgets make your site look great, but they also provide useful functions to help drive traffic and engagement. For example, adding a contact form lets visitors easily get in touch with you should they have any questions or queries.
Step 5: Create Content
Informative content that leaves a lasting impression. You don’t need to be an expert writer or programmer to get started. You can easily create quality content in WordPress by using pre-made templates for posts and pages. Also take advantage of plugins like Yoast SEO and All In One SEO Pack which help optimize your WordPress content for search engines. Additionally, there are many online resources available such as tutorials, guides, and video tutorials that will show you how to best utilize the powerful features of WordPress to craft engaging content quickly and easily.
Step 6: Engage and Grow the Audience
One way to engage and grow an audience on WordPress is through blog posts. Blogging allows you to share valuable insights, tips, and advice with readers directly. As well as create meaningful conversations about topics relevant to your industry. Furthermore, it allows potential customers to get familiar with your business before making a purchase decision. Additionally, you can use social media platforms such as Twitter or Facebook to promote your blog posts and extend their reach beyond those already visiting your website.
Conclusion:
In conclusion, launching a WordPress site is relatively easy with the right tools and knowledge. You don’t need to invest in costly web designers or developers as there are so many helpful resources available online. Start by researching the available themes, plugins, and hosting companies, and use these to craft a beautiful website that meets all your needs. Don’t forget to give yourself plenty of time for testing and troubleshooting before launching the final version of your website. Lastly, remember that this is an ongoing process.


0 Comments