
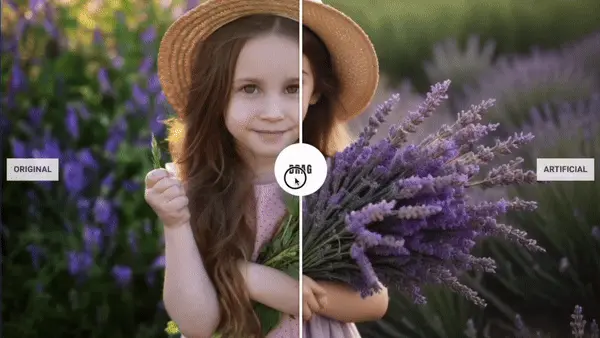
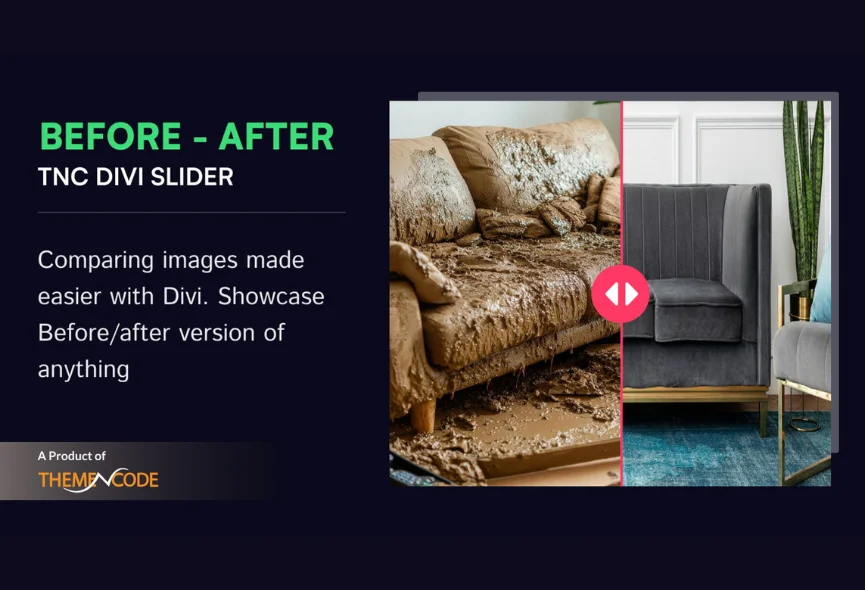
Are you a Divi user and want to make your website more functional? Before After Slider provides a perfect solution for comparing two images on your Divi website. Image comparison is the best way to highlight differences or improvements in any product or service. One of the main advantages of a before after slider is visibility. It is great for simplifying the user experience and attracting more traffic. It offers flexibility and smooth transitions. You can customize it as per your needs.
Whether you are a business owner, developer, marketer or personal user, before after slider is essential to highlight your services. This allows you to showcase side-by-side comparisons of your website images. You can quickly highlight your work results, photo retouching, various business services and more. You will find many ways to make a before after Image comparison slider in Divi, but the best way is to use a Divi module.
In this blog, I will explain why you need before after slider on your Divi website. Let’s explore this in depth.
Table of Contents
Benefits of Using Before After Slider Module in Divi
Showcase Transformations: Dramatically highlight changes before and after versions, such as weight loss, home renovations, or product designs.
Differences: You can identify improvements such as color corrections or minor adjustments.
Instant Understanding: A picture is worth a thousand words, and a before-after slider speaks volumes.
Modern & Sleek Design: It gives your website a perfect trendy look, which can help create a professional first impression.
Device Friendly: It provides the best scrolling experience on any device, such as desktop, laptop, or mobile.
Brand Identity: An image comparison creates a memorable brand experience that engages visitors automatically.
Versatile Use of Before After Slider in Divi
The Divi Before After Slider TNC provides creative possibilities for your Divi websites. Here are some compelling use cases to inspire your next project:
- Real Estate: Showcase property transformations before and after versions.
- E-commerce: Highlight product features or compare different product versions.
- Design: Demonstrate design process and improvements.
- Photography: Compare original and edited photos.
- Education: Visualize historical events or scientific experiments.
- Marketing and Advertising: Show the success of marketing campaigns.
- Create excitement for new product launches.
- Travel and Tourism: Compare destinations based on scenery, activities, or accommodations.
- Gaming: Allow players to compare different character skins or equipment options before purchasing.
- Fitness and Health: Show before-and-after fitness transformations.
How to Create a Before After Slider in Divi?
To create a slider on your Divi website, you need to select a perfect module. When choosing a module, you must consider factors such as ease of use, features, customization options, and cost. You will find many options online, but we recommend “Divi Before After Slider TNC,” which is an excellent solution. You can compare this module with its competitors to get perfect solution. Once you install the Divi Before After Slider TNC, it integrates with your Divi Builder interface. Here’s how to do it:
- Open Divi Builder: Create a new page or edit an existing one.
- Locate the Module: Find the “Divi Before After Slider TNC” section in the Divi Builder sidebar.
- Upload High-quality Images: Add your before and after images to the module’s settings. Try to add high-quality images.
- Customization: You can adjust the slider’s appearance, transition effects, and other settings to create the perfect visual comparison.
- Preview & Publish: Save and publish your page to showcase your stunning before-after comparisons.
Why Should You Choose Divi Before After Slider TNC?
Customization: You can easily customize the look of your slider to match your brand and website style. You can customize design elements to create a perfect look.

Responsive Design: Divi Before After Slider TNC ensures your comparisons look great on any device, from desktop computers to tablets and smartphones.

Integration: Quickly add before-after sliders to your Divi layouts with drag-and-drop functionality, which does not conflict with others.

User-friendly Interface: The user-friendly interface lets you quickly set up and customize your image comparisons without technical expertise.

Support & Updates: When you choose Divi Before After Slider TNC, you can access exceptional support from the ThemeNcode support team.
Conclusion
Suppose you want to create an elegant, innovative, and memorable Divi website, a before-after image comparison experience is essential. Main concern is to select the appropriate module based on your needs. With Divi before Slider TNC, you can create beautiful image comparison sliders in Divi. Adding a before-after slider to your Divi website can improve your visual storytelling, improve user engagement, and ultimately drive conversions.
So, why you need a before-after slider on your Divi website should be clear. It ensures many benefits to highlight your Divi website design and user experience.
Don’t forget to follow ThemeNcode for exciting updates and more upcoming products.


0 Comments